Embedded Storefront
The fastest path to a native look and feel for your Moonbase-powered e-commerce is using our embedded storefront. It comes with pre-built UI for customer authentication, cart management, checkout flow, license activations and much more. Although the UI is included, we've exposed a number of style variables so that you can make it yours.
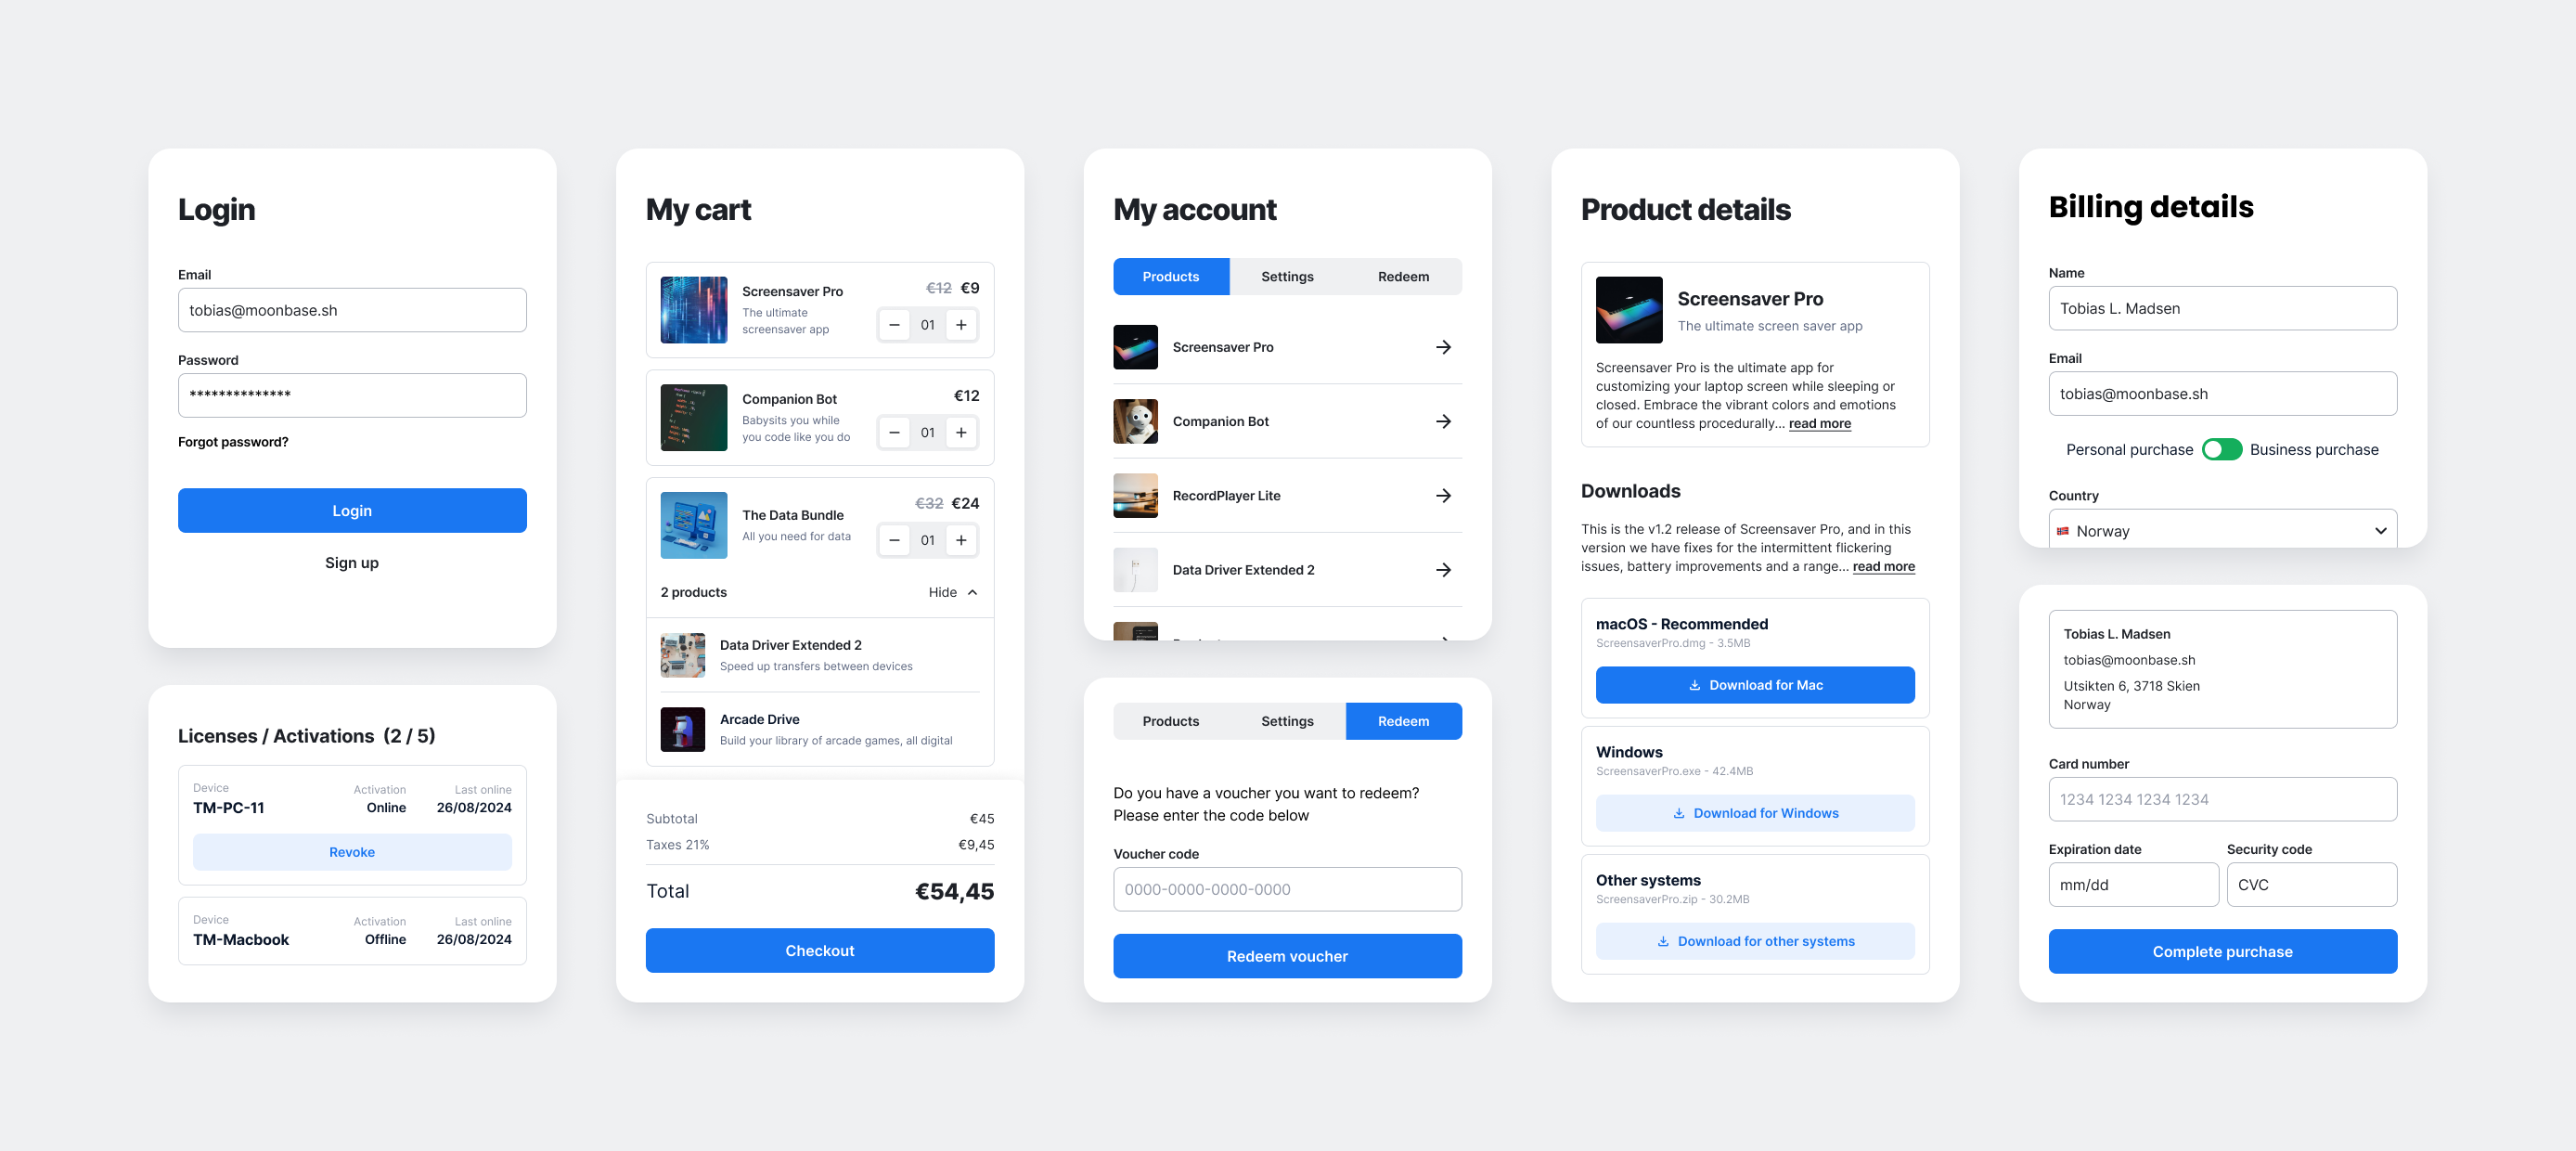
The embedded storefront can be included in your own websites, no matter what platform you use. On this page you will find instructions for popular platforms, but if yours is missing, reach out to us through the support channel, or at developers@moonbase.sh.
To make sure the module works on your website, take care to add your domain to the whitelisted domains of your Moonbase account in your account settings. If you experience CORS errors, the domain is not whitelisted correctly. Once live, you should also switch the storefront mode of your Moonbase account to direct customers to your website instead of the Moonbase hosted customer portal.
Getting started
To add e-commerce capabilities to your website, include our storefront script using the appropriate method for your platform:
Static websites and Javascript apps
A simple <script> element is enough to add the basic features, whether you're building a static website or a Javascript app with React.js, Vue.js, Svelte, or a similar framework:
<script src="https://assets.moonbase.sh/storefront/moonbase.js"></script>
<script>
    // TODO: Replace this with the URL of your Moonbase account
    Moonbase.setup('https://demo.moonbase.sh')
</script>
These scripts can be placed anywhere on the page, and should be included on every page you want storefront features available on.
The script exposes a global Moonbase object, so in a Javascript app you can call Moonbase.setup() from your own code whenever your UI is ready.
The CDN always serves the latest version, so you automatically get our improvements and bug fixes.
Read on for more details on how to configure buttons and render dynamic content.
Wordpress
In case you're running a Wordpress site, you can install the Moonbase plugin on your instance. This plugin will add the necessary scripts to your pages, and also give you the option to insert "Add to cart" buttons as part of your content, either using short codes, or as blocks in your content. The features of this plugin is quite minimal; if you need more extensive customization you should edit your theme directly.
Website builders
For other website builders, we've written some articles on how to get started:
Squarespace is a great way to make websites fast and easy, and can be combined with Moonbase to enabled advanced e-commerce capabilities. This article shows you how to get started.
Customize the experience
Everything from here on is optional, and only required if you need customizations.
Look & Feel
The Moonbase embedded storefront is themeable to some degree; you may tweak the brand color, select fonts, style buttons and cards, and more.
This is done using the theme property of the options given when first setting up the module:
{
    theme: {
        dark: true | false,
        colors: {
            primary: '#1A77F2',
            background: 'white' | 'gray',
        },
        fonts: {
            heading: 'Poppins' | 'PT Serif' | 'Montserrat' | 'Aleo',
            body: 'Inter' | 'Roboto' | 'EB Garamond' | 'Merriweather',
        },
        corners: 'sharp' | 'soft' | 'round',
        buttons: 'outlined' | 'light',
        cards: 'outlined' | 'shadow' | 'white',
    }
}
Any further customizations done by your website is not officially supported.
If you are noticing styles from your own website bleed in to the Moonbase storefront, then try to avoid any !important style rules on your own website.
Configure options
When adding the storefront to your site, you can configure other parts of the experience by overriding any the settings listed below, this is their default values:
{
  toolbar: {
    // Whether or not to show the toolbar
    enabled: true,
    // The location of the toolbar, can be one of:
    // `top-right`, `top-left`, `bottom-right`, `bottom-left`
    location: 'top-right',
    show: {
        // Whether or not to show the cart button of the toolbar
        cart: true,
        // Whether or not to show the account button of the toolbar
        account: true,
        // Whether or not to show the Moonbase logo in the toolbar
        moonbase: true,
    },
  },
  auth: {
    signIn: {
        // Enables or disables customer log-ins
        enabled: true,
        // Hint can be a string with text to show during sign in
        hint: undefined,
    },
    signUp: {
        // Enables or disables customer sign-ups
        enabled: true,
        // Changes the behavior of the newsletter toggle, can be one of:
        // `OptIn`, `OptedInByDefault`, `OptOut` - GDPR may be relevant for you
        marketingConsent: 'OptIn',
    },
    // Controls password strength requirements during sign-up and reset, one of:
    // `default` (recommended) or `lax`
    passwords: 'default',
  },
  communicationPreferences: {
    show: {
        // Whether the newsletter opt-in checkbox is shown in the Subscribe,
        // Account, and Manage preferences views.
        newsletter: true,
        // Whether the product updates opt-in checkbox is shown in the same
        // views. Set to false to drop product updates from your storefront
        // entirely.
        productUpdates: true,
    },
  },
  checkout: {
    // Changes the checkout flow to be a redirect based flow
    redirect: false,
  },
  cart: {
    // Overrides the quantity behaviour of the add to cart intents, one of:
    // `selectable`, `single`
    quantity: 'selectable',
    bundles: {
        // What happens when a bundle is added to a cart that already contains
        // one of its products: `replace` swaps the loose products for the
        // bundle, `append` keeps both side by side
        onAdd: 'replace',
        // Whether to list the contained products underneath the bundle in cart
        showProducts: true,
    },
    offers: {
      // Overrides what we show above relevant offers
      label: 'You might also like:',
    },
    leadMagnets: {
        // Quantity behavior specifically for lead magnets, one of:
        // `selectable`, `single`
        quantity: 'single',
    },
  },
  activation: {
    // Determines what device token files should be uploadable
    deviceTokenFileExtension: '.dt',
    // Sets the name of the downloaded liense token file
    licenseTokenFileName: 'license-file.mb',
    websiteLink: {
        // Whether or not to show a link to the product's website during activation
        enabled: false,
        // The label shown on the website link button
        label: 'Visit website',
    },
  },
  theme: {
    // See the above section for details on look and feel
  },
  // Opt out of automatic CSS zoom counter-scaling on hosts that ship a
  // fixed-width mobile viewport meta tag (e.g. Wix's `width=320`).
  // Leave this at false unless you specifically want the storefront to
  // render at the host's upscaled density.
  disableViewportCompensation: false,
}
To override them, simply pass in options with your configuration when setting up the storefront:
<script src="https://assets.moonbase.sh/storefront/moonbase.js"></script>
<script>
    // TODO: Replace this with the URL of your Moonbase account
    Moonbase.setup('https://demo.moonbase.sh', {
        toolbar: {
            // We have custom buttons to trigger account and cart,
            // so let's hide the default toolbar.
            enabled: false,
        }
    })
</script>
Call methods
The Moonbase embedded storefront supports a whole range features, from authentication, to e-commerce and licensing. By default, it will pick up on URL parameters that contains intents, but you can also trigger these yourself. Below is the full list of intents you can initiate:
type MoonbaseInstance = {
  // Setup
  setup(url: string, options?: DeepPartial<MoonbaseOptions>): Promise<void>
  // Update options at runtime, e.g. to switch theme after page load
  configure(options: DeepPartial<MoonbaseOptions>): void

  // Events (see "Listen for events" below)
  on<TEvent extends MoonbaseEvent>(
    eventType: TEvent,
    callback: (event: MoonbaseEventArgs[TEvent]) => void,
  ): void

  // Identity
  sign_in(parameters?: { email?: string; }): void
  sign_up(parameters?: { email?: string; }): void
  forgot_password(parameters?: { email?: string; }): void
  reset_password(parameters: { email: string; code: string; }): void
  confirm_account(parameters: { email: string; code: string; }): void
  confirm_email(parameters: { email: string; code: string; }): void
  confirm_email_change(parameters: { email: string; code: string; }): void
  connect_account(parameters: { provider_id: string; }): void

  // Communication preferences
  subscribe(parameters?: { email?: string; }): void
  confirm_communication_preferences(parameters: { email: string; token: string; }): void
  manage_communication_preferences(parameters: { email: string; token: string; }): void

  // Customer
  view_account(): void
  view_products(): void
  view_subscriptions(): void
  redeem_voucher(parameters?: { code?: string; }): void

  // Products
  view_product(parameters: { product_id: string; version?: string; }): void
  download_product(parameters: { product_id: string; version?: string; key?: string; }): void
  activate_product(parameters?: { token?: string; }): void

  // Subscriptions
  manage_subscription(parameters: { subscription_id: string; }): void

  // Orders
  view_cart(): void
  add_to_cart(parameters?: {
    product_id?: string;
    bundle_id?: string;
    variation_id?: string;
    quantity?: number;
    offer_id?: string;
    show_cart?: boolean;
  }): Promise<void>
  purchase(parameters?: {
    product_id?: string;
    bundle_id?: string;
    variation_id?: string;
    quantity?: number;
    coupon_code?: string;
  } | {
    product_id?: string;
    bundle_id?: string;
    variation_id?: string;
    quantity?: number;
    coupon_code?: string;
  }[]): Promise<void>
  checkout(parameters?: { complete?: boolean; }): void
  close_checkout(): void

  // Meta
  view_about(): void
}
To actually trigger the UI elements, you can add onclick handlers to buttons like so:
<button onclick="Moonbase.add_to_cart({ product_id: 'example-product' })">
    Add to cart
</button>
<button onclick="Moonbase.purchase({ bundle_id: 'example-bundle', quantity: 2 })">
    Buy now
</button>
Or you can call them from your own scripts using the global Moonbase object:
const onAddToCartButtonClick = () => {
    Moonbase.add_to_cart({ product_id: 'example-product' })
};
The purchase intent also accepts an optional coupon_code that is applied to the freshly-created order before checkout opens.
If the backend rejects the code (invalid, expired, not applicable, etc.) checkout still opens without the discount and a coupon-rejected event fires so you can react in your own UI:
Moonbase.purchase({ product_id: 'example-product', coupon_code: 'SUMMER25' })
In the rare case you want to trigger these directly through a URL, you may use query parameters by prepending a mb_ prefix to a intent parameter along with all other parameters that the method expects.
The add-to-cart example above can be triggered using the following URL:
https://example.com?mb_intent=add_to_cart&mb_product_id=example-product
The same pattern works for purchase with a coupon — useful for marketing emails and campaign landing pages:
https://example.com?mb_intent=purchase&mb_product_id=example-product&mb_coupon_code=SUMMER25
Render dynamic content
The embedded storefront will fetch and cache data related to products & bundles, the authenticated customer, and the current cart. To make your web site dynamic, we support rendering and conditionally hiding/showing elements part of your site.
Rendering content is as simple as adding the data-moonbase-render attribute to the elements you want dynamic content to appear in:
<button data-moonbase-render="user.name" onclick="Moonbase.view_account()">
    Account
</button>
Any initial content will be replaced with data loaded by the embedded storefront, if present. In the above example, the button will show "Account" until a customer signs in, after which it will show the user's name.
The available properties to render are:
# User properties
user.name
user.email

# Cart properties
cart.item_count

# Product properties
product.<product_id>.name
product.<product_id>.price
product.<product_id>.original_price
product.<product_id>.discount_name
product.<product_id>.discount_description
product.<product_id>.discount_total

# Bundle properties
bundle.<bundle_id>.name
bundle.<bundle_id>.price
bundle.<bundle_id>.original_price
bundle.<bundle_id>.discount_name
bundle.<bundle_id>.discount_description
bundle.<bundle_id>.discount_total

# You can also access data for specific pricing variations:
product.<product_id>.variation[<variation_id>].price
product.<product_id>.variation[<variation_id>].original_price
product.<product_id>.variation[<variation_id>].discount_name
product.<product_id>.variation[<variation_id>].discount_description
product.<product_id>.variation[<variation_id>].discount_total
Using these, you can enrich your static websites with dynamic data based on the current pricing configured in Moonbase, as well as the context of the customer currently logged in, including segmented discounts they may have access to.
If you have sub-products (a parent-product.child-product style ID), reference them with the same dotted ID — every segment is treated as part of the product ID, with the property name still trailing after the last dot:
<span data-moonbase-render="product.parent-product.child-product.price">$0.00</span>
In case you have elements you want to only conditionally show based on properties, we support a data-moonbase-if attribute:
<button
    hidden
    data-moonbase-if="user"
    data-moonbase-render="user.name"
    onclick="Moonbase.view_account()"
>My account</button>
Any elements with data-moonbase-if attributes will have their hidden attribute set based on storefront context.
In the above example, we add the hidden attribute to ensure it's hidden by default, and only when a user is authenticated will it show.
All of these can also be negated by prefixing them with a !, enabling more complex use-cases like conditionally showing a add-to-cart button based on if the customer owns the product or not:
<button data-moonbase-if="!product.example-product.owned" onclick="Moonbase.add_to_cart({ product_id: 'example-product' })">
    Add to cart
</button>
<span hidden data-moonbase-if="product.example-product.owned">
    Already in your library
</span>
The available properties to conditionally render based on are:
# User properties
user

# Cart properties
cart.has_items
cart.contains_product.<product_id>
cart.contains_product.<product_id>.variation[<variation_id>]
cart.contains_bundle.<bundle_id>
cart.contains_bundle.<bundle_id>.variation[<variation_id>]

# Product properties
product.<product_id>
product.<product_id>.owned
product.<product_id>.has_discount
product.<product_id>.has_discount_description
product.<product_id>.variation[<variation_id>].has_discount
product.<product_id>.variation[<variation_id>].has_discount_description

# Bundle properties
bundle.<bundle_id>
bundle.<bundle_id>.has_discount
bundle.<bundle_id>.has_discount_description
bundle.<bundle_id>.variation[<variation_id>].has_discount
bundle.<bundle_id>.variation[<variation_id>].has_discount_description
The owned conditional is only available at the product level, since ownership doesn't depend on which variation was purchased.
Make sure your CSS sheets include a rule to actually hide elements that are hidden!
Most modern CSS resets have this, but you can also add a [hidden] { display: none !important; } rule yourself.
Recipes
By combining data-moonbase-if, data-moonbase-render, and intent calls, you can build most of the patterns you'd otherwise reach for a framework to handle. The snippets below are copy-pasteable starting points — adapt the markup and class names to fit your own design system.
All recipes assume [hidden] { display: none !important; } is present in your stylesheet so that elements with the hidden attribute actually disappear.
Account link that adapts to sign-in state
Show a "Sign in" button to anonymous visitors, and swap it for a personalized account link once a customer signs in:
<button hidden data-moonbase-if="!user" onclick="Moonbase.sign_in()">
    Sign in
</button>
<button hidden data-moonbase-if="user" onclick="Moonbase.view_account()">
    Hi, <span data-moonbase-render="user.name">there</span>
</button>
Cart button with item-count badge
A cart button that stays out of the way when empty, and shows a live item count when the customer has added something:
<button hidden data-moonbase-if="cart.has_items" onclick="Moonbase.view_cart()">
    Cart
    (<span data-moonbase-render="cart.item_count">0</span>)
</button>
Buy vs. owned toggle
Hide the purchase button once a customer already owns the product, and replace it with a confirmation message (or an activation/download call):
<button
    hidden
    data-moonbase-if="!product.example-product.owned"
    onclick="Moonbase.add_to_cart({ product_id: 'example-product' })"
>Add to cart</button>

<span hidden data-moonbase-if="product.example-product.owned">
    Already in your library
</span>
Discounted price display
Show a clean price by default, and reveal the original (struck-through) price plus a discount label only when a discount is actually applied:
<p>
    <span data-moonbase-render="product.example-product.price">$0.00</span>
    <s hidden data-moonbase-if="product.example-product.has_discount"
       data-moonbase-render="product.example-product.original_price">$0.00</s>
</p>

<span
    hidden
    data-moonbase-if="product.example-product.has_discount_description"
    data-moonbase-render="product.example-product.discount_description"
></span>
Variation-aware pricing card
Render pricing for a specific variation (here, the starter tier) and gate the savings line on that variation's own discount state, so a sale on a different variation doesn't bleed into this card:
<div>
    <h3 data-moonbase-render="product.example-product.name">Example product</h3>
    <p>
        <strong data-moonbase-render="product.example-product.variation[starter].price">$0.00</strong>
        <s hidden data-moonbase-if="product.example-product.variation[starter].has_discount"
           data-moonbase-render="product.example-product.variation[starter].original_price">$0.00</s>
    </p>
    <small hidden data-moonbase-if="product.example-product.variation[starter].has_discount">
        Save <span data-moonbase-render="product.example-product.variation[starter].discount_total">$0.00</span>
    </small>
    <button onclick="Moonbase.purchase({ product_id: 'example-product', variation_id: 'starter' })">
        Buy starter
    </button>
</div>
Voucher redemption entry point
A simple button to open the voucher redemption flow. For marketing emails or landing pages, you can also pre-fill the code via the URL parameter form (?mb_intent=redeem_voucher&mb_code=WELCOME10):
<button onclick="Moonbase.redeem_voucher()">
    Redeem a code
</button>
Reference implementation
For a complete, end-to-end example of everything on this page composed into a real site, see the open-source Corino reference site. It's a single index.html for a fictional audio-plugin company, wired to the public demo.moonbase.sh Moonbase account — it exercises Moonbase.setup with theming, intent links, data-moonbase-if for conditional UI, data-moonbase-render for live pricing, and owned/unowned product CTAs.
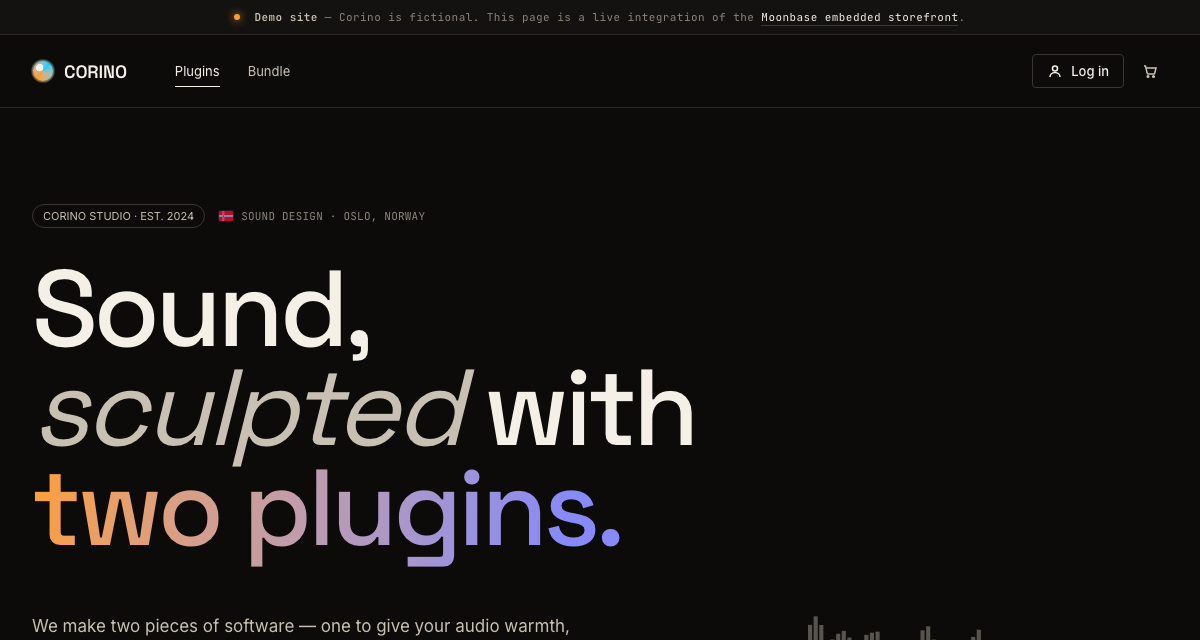
Try it live at corino.moonbase.sh — sign up with any email, add a plugin to your cart, and walk through the embedded checkout against the demo Moonbase account. Then read the source:
A single-file reference site demonstrating the embedded storefront end-to-end against the demo Moonbase account.
Forward events to analytics tools
The embedded storefront can forward its commerce and authentication events straight to the marketing and analytics tools you already use, with no event wiring or glue code required. Just hand Moonbase the same ids you use with each vendor, and it takes care of the rest:
<script src="https://assets.moonbase.sh/storefront/moonbase.js"></script>
<script>
    // TODO: Replace this with the URL of your Moonbase account
    Moonbase.setup('https://demo.moonbase.sh', {
        integrations: {
            metaPixel:        { pixelId: '1234567890' },
            googleAnalytics:  { measurementId: 'G-XXXXXXX' },
            googleTagManager: { containerId: 'GTM-XXXXXXX' },
            klaviyo:          { companyId: 'ABC123' },
            tiktokPixel:      { pixelId: 'C12345...' },
        },
    })
</script>
Meta Pixel, Google Analytics 4, Google Tag Manager, Klaviyo, and TikTok Pixel are supported out of the box. Enable only the providers you need, and leave the rest out.
The storefront never loads any of these SDKs for you.
It only forwards to the globals your page has already initialized with each vendor's own snippet (window.fbq, window.gtag, window.dataLayer, window.klaviyo, window.ttq).
Load order doesn't matter: if a global only appears after setup(), forwarding simply begins once it's there.
And if a provider is enabled but its global is never found, forwarding is a silent no-op, with a one-time console.warn so the misconfiguration is easy to spot.
Forwarding relies on each SDK's own consent state (for example Google Consent Mode, or your cookie banner gating fbq).
To hold off forwarding until a visitor opts in, leave the provider out of setup() and add it once consent is granted with Moonbase.configure(...).
You can add, change, or remove providers at any time with configure().
Merge semantics apply per provider: pass one to add or update it, pass undefined to remove it, or omit it to leave it untouched, so enabling a provider after consent never disturbs the others.
// Start forwarding to Meta Pixel once the visitor has consented
onConsentGranted(() =>
    Moonbase.configure({ integrations: { metaPixel: { pixelId: '1234567890' } } }))

// Later, stop forwarding to Meta Pixel while leaving the rest running
Moonbase.configure({ integrations: { metaPixel: undefined } })
Your key commerce events (added-to-cart, checkout-initiated, and checkout-completed) are forwarded as each platform's equivalent (add to cart, begin checkout, and purchase), alongside the signed-in, signed-up, and signed-out events for identifying customers.
A couple of conventions are worth knowing: the forwarded order value is the amount the customer actually pays (post-discount and tax-inclusive), and completed purchases carry the order id as a deduplication key, so a single order is never counted twice.
For any event or provider the built-in integrations don't cover, you can still listen for events and forward them by hand, as described below.
Listen for events
For analytics destinations or events the built-in integrations above don't cover, or any time you simply want to react to the storefront yourself, you can register event listeners directly on the Moonbase instance. These work much like native HTML event listeners:
Moonbase.on('checkout-completed', event => console.log('Purchase completed:', event.order))
Event names are passed as plain strings, and each event comes with a matching payload (for example the completed order above).
These are all the available events you can currently listen for:
// Identity related events
'signed-in': {
    user: User
}
'signed-up': {
    user: User
}
'signed-out': {
    user: User
}

// Voucher related events
'redeemed-voucher': {
    voucher: Voucher
    user: User
}

// Storefront related events
// Fired whenever the cached storefront data (products, pricing, ownership,
// cart) changes — useful as a single hook for re-rendering custom UI.
'storefront-updated': {
    storefront: Storefront
    user?: User | null
}

// Product related events
'downloaded-product': {
    product: OwnedProduct
    download: Download
    user?: User | null
}
'activated-product': {
    product: StorefrontProduct
    fulfillmentType: ActivationRequestFulfillmentType
    user?: User | null
}

// Cart related events
'added-to-cart': {
    item: CartItem
    currency: string
    user?: User | null
}
'coupon-rejected': {
    code: string
    user?: User | null
}
'checkout-initiated': {
    order: OpenOrder
    total: Money
    user?: User | null
}
'checkout-closed': {
    order: Order
    user?: User | null
}
'checkout-completed': {
    order: Order
    user?: User | null
}
For worked examples of forwarding events to analytics by hand (handy when you need a destination or custom mapping the built-in integrations don't provide), check out these articles:
See how you can hook up the embedded storefront to send e-commerce events to Google Analytics
If you are doing Facebook, Instagram or WhatsApp marketing, you should be enriching your Meta Pixel events with actions done by customers in the embedded storefront, learn more in this article.